Are you experiencing high CPU and RAM usage in Windows Explorer on Windows 10? If so, you’re not alone. Many users have reported this issue, but luckily, there are a few simple steps you can take to resolve it. In this article, we’ll explain how to fix high CPU and RAM usage in Windows Explorer on Windows 10. We’ll also provide some tips to help you prevent this issue from happening again.
Identifying the Cause of High CPU and RAM Usage in Windows Explorer
High CPU and RAM usage in Windows Explorer can be a major cause of computer slowdown and other issues. It can be caused by a variety of factors, including malware, driver issues, or hardware problems. Identifying the cause of high CPU and RAM usage in Windows Explorer is essential for resolving the issue and restoring the computer to optimal performance.
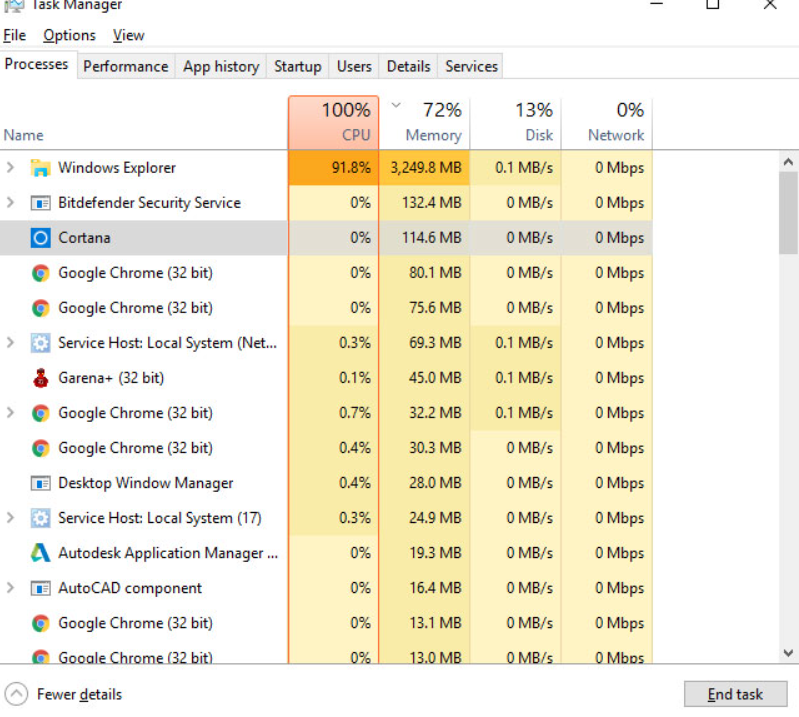
The first step in identifying the cause of high CPU and RAM usage in Windows Explorer is to open the Task Manager. This can be done by pressing Ctrl+Alt+Del and selecting Task Manager. In the Task Manager, you can view the CPU and RAM usage of each process. If you notice that Windows Explorer is using a large amount of CPU and RAM, then it is likely the cause of the issue.
The next step is to determine what is causing the high CPU and RAM usage in Windows Explorer. Malware is one of the most common causes of high CPU and RAM usage in Windows Explorer. Malware can cause Windows Explorer to use a large amount of resources as it attempts to spread itself throughout the system. If you suspect that malware is the cause of the issue, then you should run a full system scan with an anti-malware program.
Driver issues can also cause high CPU and RAM usage in Windows Explorer. Outdated or corrupted drivers can cause Windows Explorer to use more resources than necessary. To resolve this issue, you should update all of your drivers to the latest version.
Hardware problems can also cause high CPU and RAM usage in Windows Explorer. If your computer is overheating, then it can cause Windows Explorer to use more resources than necessary. You should check the temperature of your computer and make sure that it is not running too hot.
Once you have identified the cause of the high CPU and RAM usage in Windows Explorer, you can take steps to resolve the issue. If the issue is caused by malware, then you should run a full system scan with an anti-malware program. If the issue is caused by driver issues, then you should update all of your drivers to the latest version. If the issue is caused by hardware problems, then you should check the temperature of your computer and make sure that it is not running too hot.
Identifying the cause of high CPU and RAM usage in Windows Explorer is essential for resolving the issue and restoring the computer to optimal performance. By following the steps outlined above, you can quickly identify the cause of the issue and take steps to resolve it.
Optimizing Windows 10 Settings to Reduce High CPU and RAM Usage
Windows 10 is a powerful operating system, but like any other OS, it can suffer from high CPU and RAM usage. Fortunately, there are several ways to optimize Windows 10 settings to reduce the amount of CPU and RAM usage.
The first step is to make sure your system is up to date. Windows 10 has a built-in feature called Windows Update that will automatically download and install the latest system updates. This will ensure that your system is running the most efficient version of Windows 10.
Next, you should check your startup programs. Many programs will automatically start when you turn on your computer, and some of these programs may be using up valuable CPU and RAM resources. To check your startup programs, open the Task Manager (right-click on the taskbar and select Task Manager) and click on the Startup tab. Here, you can disable any programs that you don’t need to be running at startup.
Another way to reduce CPU and RAM usage is to limit the number of background processes running on your system. To do this, open the Task Manager and click on the Details tab. Here, you can see all the processes running on your system and you can disable any that you don’t need.
Finally, you should consider disabling any unnecessary services. Services are programs that run in the background and can take up valuable CPU and RAM resources. To disable services, open the Run dialog box (press Windows Key + R) and type “services.msc”. Here, you can disable any services that you don’t need.
By following these steps, you can optimize Windows 10 settings to reduce high CPU and RAM usage. Doing so will ensure that your system is running as efficiently as possible and that you’re getting the most out of your hardware.
Troubleshooting Windows Explorer to Resolve High CPU and RAM Usage
Troubleshooting Windows Explorer to Resolve High CPU and RAM Usage is a necessary task for anyone who experiences performance issues on their computer. High CPU and RAM usage can be caused by a variety of factors, but one of the most common culprits is Windows Explorer. Windows Explorer is the graphical user interface (GUI) for Windows operating systems and is responsible for displaying the files and folders on your computer. When Windows Explorer is running inefficiently, it can cause your computer to experience slowdowns, freezes, and other performance issues.
Fortunately, there are a few steps you can take to troubleshoot Windows Explorer and resolve high CPU and RAM usage. The first step is to identify which process is causing the high CPU and RAM usage. To do this, open the Task Manager by pressing Ctrl + Alt + Delete and then click on the Processes tab. Look for the process named “explorer.exe” and check its CPU and RAM usage. If the process is using a large amount of CPU and RAM, then it is likely the cause of your performance issues.
Once you have identified the process, the next step is to identify what is causing the process to be so inefficient. This can be done by examining the list of running programs and services in the Task Manager. Look for any programs or services that are using a large amount of CPU and RAM and then try to determine why they are running. If you can’t identify the cause, then you may need to disable or uninstall the program or service.
Finally, you can try to optimize Windows Explorer to reduce its CPU and RAM usage. To do this, open the Start menu and type “performance” into the search box. Select “Adjust the appearance and performance of Windows” and then click on the “Advanced” tab. Under the “Visual Effects” section, select “Adjust for best performance” and then click “OK”. This will disable some of the visual effects in Windows Explorer, which can help reduce its CPU and RAM usage.
By following these steps, you should be able to troubleshoot Windows Explorer and resolve high CPU and RAM usage. If the issue persists, then you may need to reinstall Windows or seek help from a professional.
Disabling Unnecessary Processes and Services to Reduce High CPU and RAM Usage
Disabling unnecessary processes and services is an effective way to reduce high CPU and RAM usage. This is especially true if your computer is running slowly or if it is crashing frequently. By disabling unnecessary processes and services, you can free up system resources and improve the overall performance of your computer.
When it comes to disabling unnecessary processes and services, the first step is to identify which processes and services are running on your computer. This can be done by using the Task Manager in Windows or the Activity Monitor in Mac OS. Once you have identified the processes and services that are running, you can then decide which ones to disable.
When disabling processes and services, it is important to be careful. You should only disable processes and services that you are sure are not needed. For example, if you are not using a particular program, you should disable the associated process or service. Similarly, if you are not using a particular device, you should disable the associated service.
It is also important to be aware of the consequences of disabling processes and services. Disabling certain processes and services can cause certain programs to not work properly or even crash. Therefore, it is important to make sure that you are disabling only the processes and services that you are sure are not needed.
Once you have identified the processes and services that you want to disable, you can do so by using the Task Manager in Windows or the Activity Monitor in Mac OS. In the Task Manager, you can right-click on the process or service and select “End Task” or “End Process”. In the Activity Monitor, you can select the process or service and click the “Quit” button.
By disabling unnecessary processes and services, you can free up system resources and improve the overall performance of your computer. However, it is important to be careful when disabling processes and services, as it can cause certain programs to not work properly or even crash. Therefore, it is important to make sure that you are disabling only the processes and services that you are sure are not needed.
Using System Cleanup Tools to Improve Performance and Reduce High CPU and RAM Usage
System cleanup tools are designed to help improve the performance of a computer by reducing high CPU and RAM usage. They can be used to free up disk space, remove unnecessary files, and optimize system settings.
When a computer’s CPU and RAM usage is high, it can lead to slow performance, freezing, and even crashing. This can be caused by a variety of factors, such as a lack of disk space, too many programs running in the background, or an outdated operating system. System cleanup tools can help to address these issues and improve the overall performance of the computer.
One of the most important aspects of using system cleanup tools is to free up disk space. This can be done by deleting temporary files, removing unused programs, and uninstalling any unnecessary software. Additionally, system cleanup tools can be used to defragment the hard drive, which can help to speed up the computer’s performance.
System cleanup tools can also be used to optimize system settings. This includes disabling unnecessary startup programs, adjusting the virtual memory settings, and disabling services that are not needed. Additionally, system cleanup tools can be used to repair any errors in the Windows registry, which can help to improve the overall performance of the computer.
Finally, system cleanup tools can be used to reduce high CPU and RAM usage. This can be done by disabling any unnecessary programs or services that are running in the background. Additionally, system cleanup tools can be used to adjust the power settings, which can help to reduce the amount of power being used by the computer.
Overall, system cleanup tools can be a great way to improve the performance of a computer and reduce high CPU and RAM usage. By freeing up disk space, optimizing system settings, and disabling unnecessary programs and services, system cleanup tools can help to improve the overall performance of the computer.
To conclude, resolving high CPU and RAM usage in Windows Explorer on Windows 10 can be done by disabling certain features, such as Windows Search, Windows Defender, and the Superfetch service. Additionally, you can also reduce the amount of RAM used by running fewer programs and clearing out your system’s temporary files. By following these steps, you can help improve the performance of your Windows 10 system and reduce the amount of CPU and RAM usage.